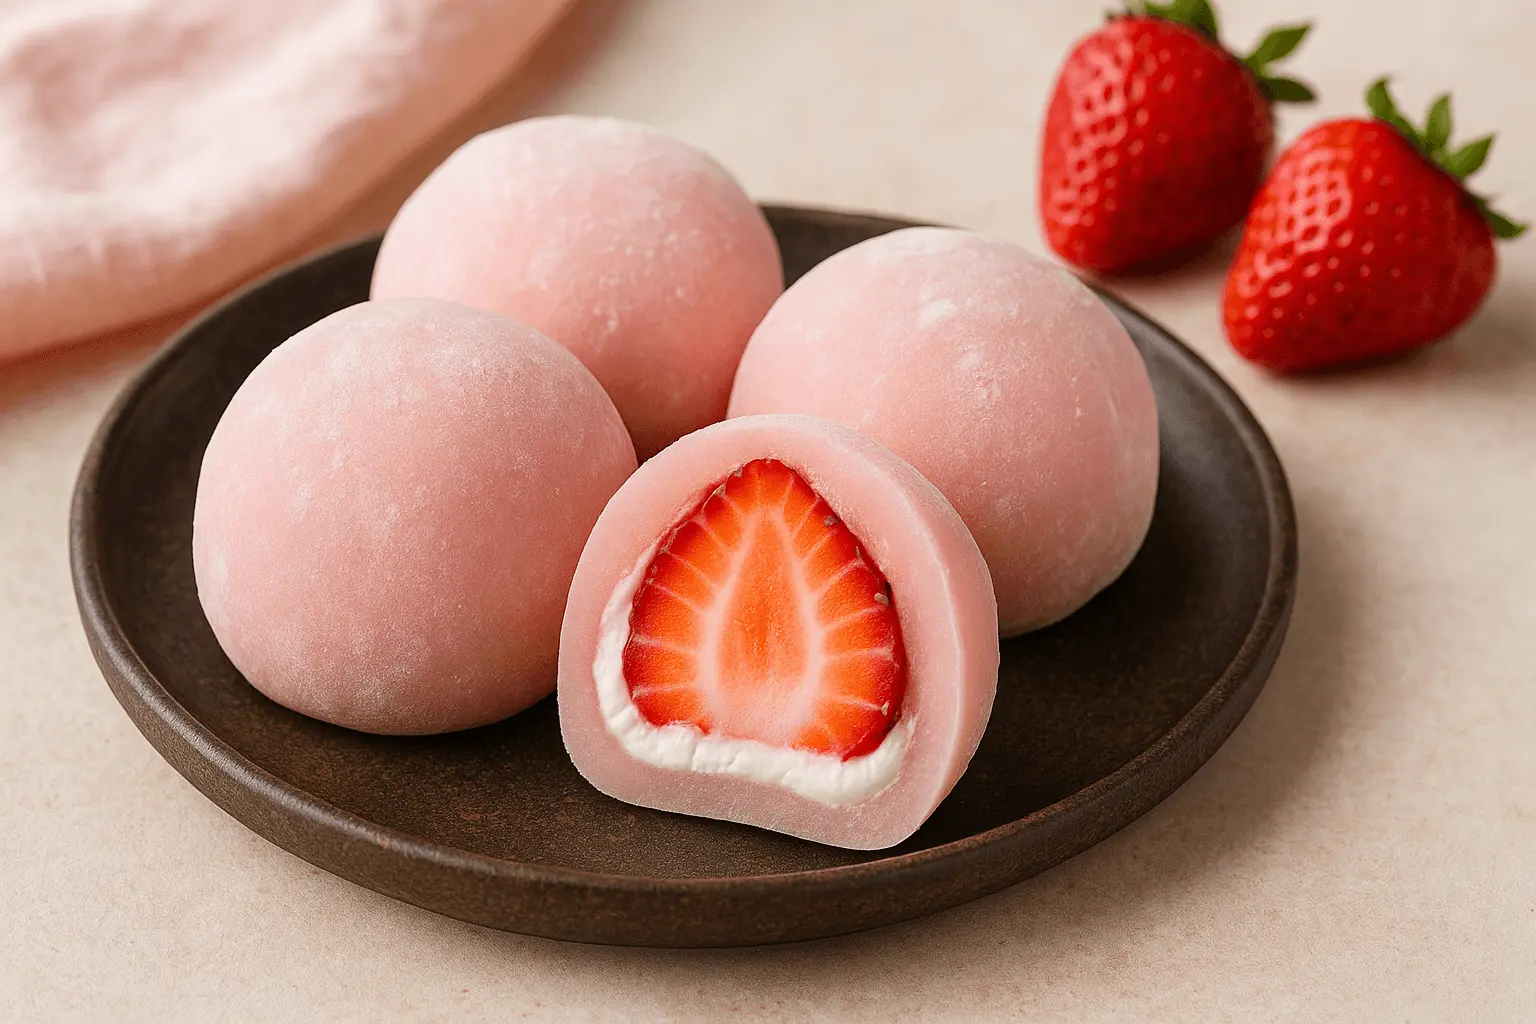
There’s something so comforting about making a dessert with your hands – especially when it’s soft, sweet, and just a little bit playful. That’s what I love about mochi strawberry. You get to stretch the dough, wrap each berry like a little gift, and end up with something that looks like it came from a fancy bakery.
The first time I tried making these, I was honestly nervous. But once I figured out a few tricks (like how to keep it from sticking and how to wrap without tearing), I couldn’t stop making them.
This recipe breaks everything down step-by-step so you feel confident from the start. I’ll show you how to make the dough, fill it with either sweet red bean or creamy vanilla, and shape each piece so it’s smooth, sealed, and adorable. Along the way, I’ll share tips that make it easier, fun variations to try, and the best ways to store and serve them.
Whether you’re making these for a birthday, a picnic, or just a cozy afternoon in the kitchen, you’re going to love what’s ahead. Let’s get those strawberries ready!
Why You’ll Love Mochi Strawberry at Home
If you love sweet little projects in the kitchen that are just as fun to make as they are to eat, mochi strawberry will steal your heart. It’s soft, chewy, fruity, and surprisingly simple once you know the steps. And the best part? It’s a total crowd-pleaser, whether you’re serving it to family, friends, or treating yourself.
- Family-friendly activity – The hands-on shaping is perfect for making with kids or loved ones.
- Quick and easy to make – With just a few ingredients and simple tools, it’s totally doable on a relaxed afternoon.
- Customizable filling – Use sweet bean paste for a traditional touch or vanilla cream for a lighter twist.
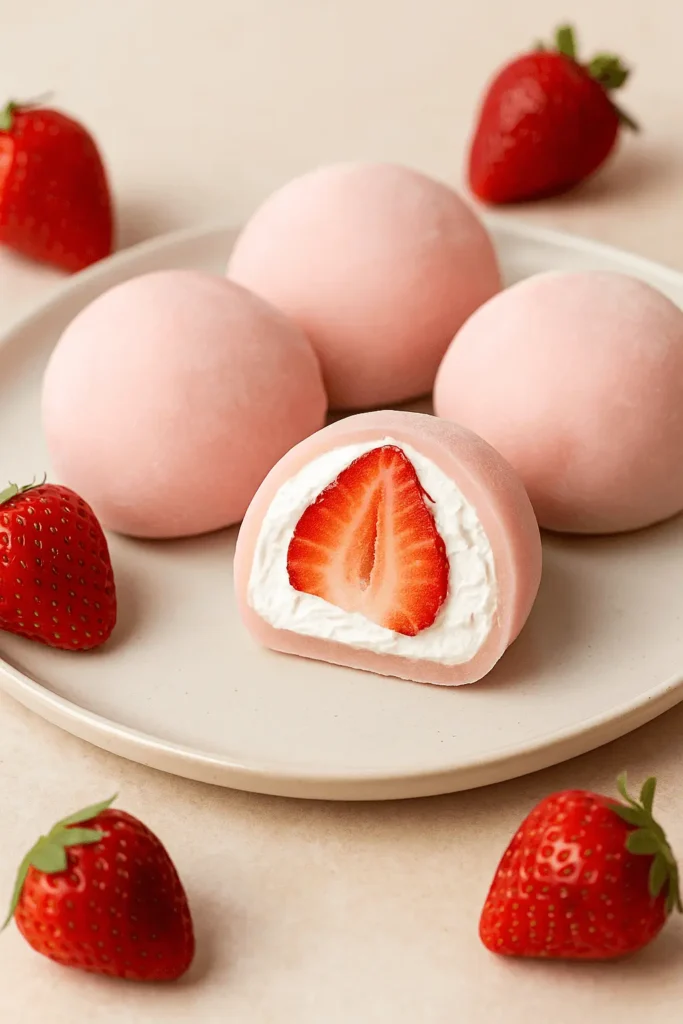
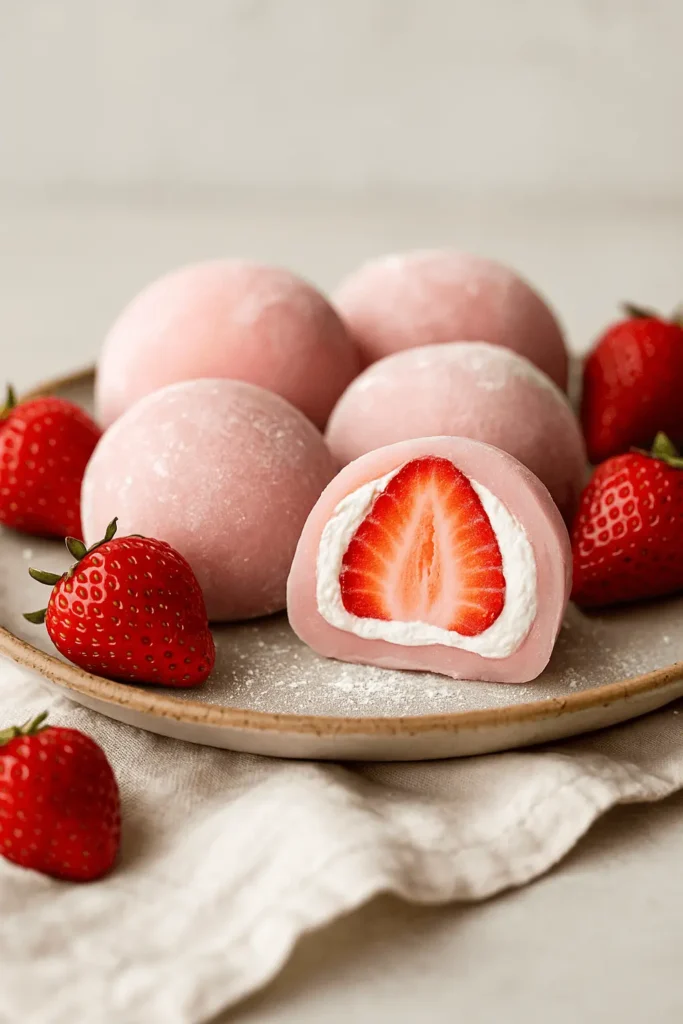
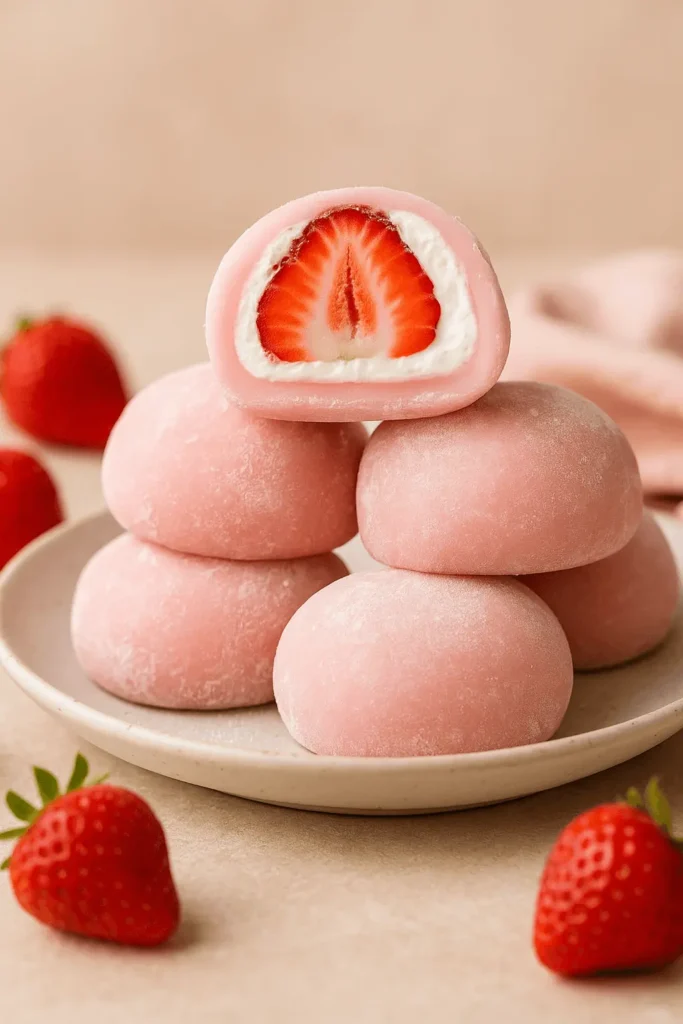
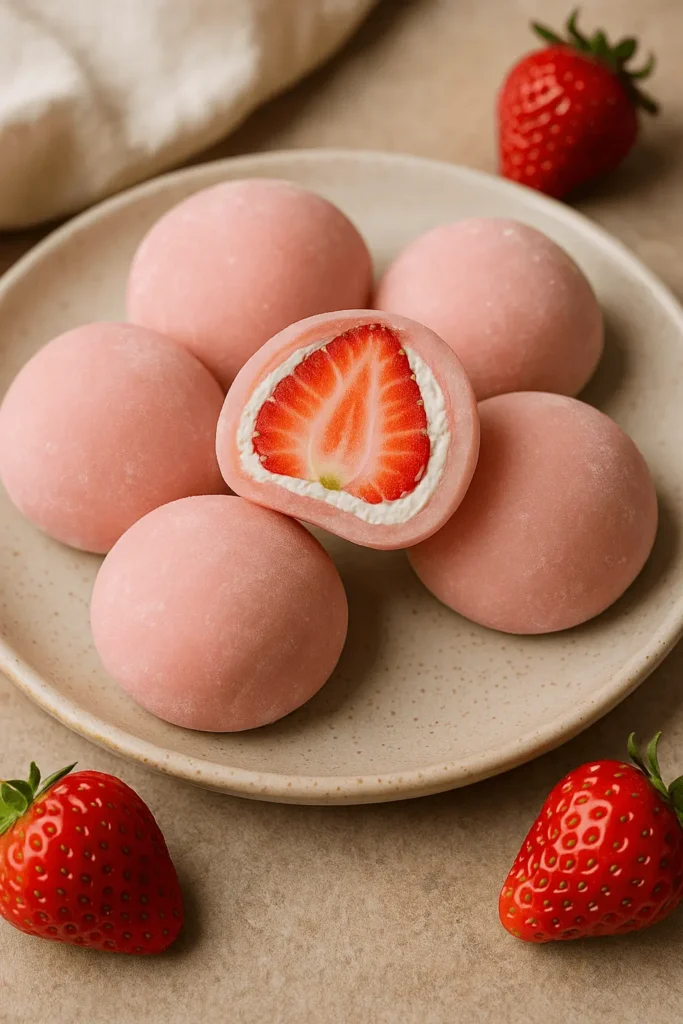
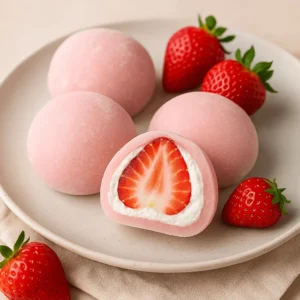
- Beautiful presentation – Each bite looks like it came from a café, especially when sliced to show the strawberry center.
- Perfect for any occasion – Whether it’s a birthday, picnic, or cozy weekend, strawberry mochi fits right in.
It’s one of those recipes you’ll come back to again and again, not just because it’s cute, but because it brings joy to make and share. Let’s take a look at what you’ll need to get started.
Mochi Strawberry Ingredients and Filling Ideas
Let’s start with the good stuff – what you’ll actually need on your kitchen counter. The beauty of mochi strawberry is that it doesn’t ask for anything fancy. A few pantry basics and fresh strawberries come together to make something truly special. I’ll walk you through what each ingredient does so you feel ready before even picking up a spoon.
Basic Ingredients:
- 1 cup glutinous rice flour (mochiko) – This is the key to that chewy, stretchy dough. It’s different from regular rice flour, so double-check the label.
- ¼ cup sugar – Adds a light sweetness and helps soften the dough.
- ¾ cup water – Binds the flour and sugar into a smooth batter for cooking.
- Pinch of salt – Just enough to balance the flavor.
- 8 fresh strawberries (small to medium) – Washed, hulled, and thoroughly dried for the best wrap and bite.
- ½ cup potato starch or cornstarch – For dusting your hands and surface, so nothing sticks.
Filling Options:
- 1 cup sweet red bean paste (anko) – A classic choice with just enough sweetness to complement the berries.
or - 1 cup vanilla cream – Made from whipped cream with a little powdered sugar and vanilla for a light, cloud-like filling.
Optional Add-Ins:
- ½ tsp matcha powder – For a subtle earthy flavor and soft green tint.
- 1 Tbsp freeze-dried strawberry powder – To add more berry aroma and a pretty pink hue.
- 2 Tbsp cream cheese – Mix into the cream for a richer center with a little tang.
Pro Tip: For a fun twist, try adding lemon zest or orange blossom water to the dough for a bright citrus spin. You can even go with a hint of cocoa for something a little different – great if you’re making this for a special occasion or themed dessert board.
With everything gathered and prepped, it’s time to roll up your sleeves and bring these little treats to life!
How to Make Mochi Strawberry Step-by-Step
Making mochi strawberry is a calm, hands-on process that’s surprisingly fun – kind of like arts and crafts, but edible. Take your time with each step and enjoy the rhythm of it.
1. Prep the strawberries
Wash, hull, and dry your strawberries thoroughly. Any leftover moisture can keep the dough from sealing properly. Set them aside on a paper towel while you prepare the filling.
2. Wrap the strawberries in filling
If you’re using anko: divide it into 8 pieces and gently press each into a disc. Wrap each strawberry (pointed end down) in the paste, leaving the tip barely covered.
If you’re using cream: whip it until soft peaks form, then chill. Use a spoon to gently coat each strawberry, then freeze for about 10 minutes to help it hold its shape.
3. Make the mochi dough
In a microwave-safe bowl, mix the glutinous rice flour, sugar, salt, and water until smooth – no lumps.
Microwave for 1 minute, stir, then microwave again for another minute. After that, heat in 30-second bursts, stirring each time, until the dough turns glossy and stretchy. You’ll know it’s ready when the dough starts to loosen from the bowl and comes together in a shiny, stretchy mass. (Total time: 2½ to 3½ minutes.)
No microwave? Steam it covered for 15 minutes, stirring halfway through.
4. Dust your surface and cool the dough
Sprinkle potato starch or cornstarch generously onto a clean work surface. Carefully scrape the hot dough onto it and dust the top as well. Let it cool for about 2–3 minutes until it’s warm but safe to handle.
5. Divide and shape the dough
Using a bench scraper or knife, divide the dough into 8 equal pieces. Keep the unused pieces loosely covered with plastic wrap so they don’t dry out.
Dust your hands, then flatten each piece into a small circle, about 3 to 3½ inches wide. Press the center just a bit thicker than the edges to help it hold the filling without tearing.
6. Wrap the strawberries
Place one filled strawberry in the center of a dough round, tip-side down. Gently pull the edges up and around the berry, pleating slightly if needed. Pinch the top to seal, twist off any extra dough, and smooth the seam.
Set it seam-side down on a starch-dusted liner and repeat with the rest.
7. Let them rest
Once they’re all wrapped, let them sit for about 10 minutes to relax the dough. This helps the texture settle and makes the surface easier to brush clean.
8. Serve and enjoy!
Use a soft brush or your fingers to remove any extra starch. Serve them at room temperature for the best texture – or chill briefly if you’ve filled them with cream.
Mochi making might sound tricky at first, but once you wrap your first one, you’ll see how calming (and honestly satisfying) it can be.
I’ll share some helpful chef tips and fun variations to keep your strawberry mochi experience fresh every time.
Mochi Tips and Easy Variations to Try
Once you’ve made mochi strawberry once or twice, you’ll get the rhythm – and then it becomes a fun little kitchen ritual. Here are some of my favorite tips and variations to help you level up or personalize your next batch:
- Keep things dry and chill – Moisture makes sealing tricky, so dry strawberries well and chill the filling before wrapping.
- Don’t overcook the dough – Stop microwaving when it looks glossy and stretchy. Too much heat makes it stiff and harder to work with.
- Work while it’s warm – The dough is most flexible just after cooling a minute or two. If it gets cold, it turns harder to shape.
- Use potato starch for smooth handling – It dusts evenly and brushes off more cleanly than cornstarch.
- Customize your flavor – Add a dash of matcha for a subtle tea flavor, or fold a bit of freeze-dried strawberry powder into the dough for a pink tint and berry boost.
- Switch up the filling – Try cream cheese mixed with vanilla cream for a little tang, or even chocolate spread for a cozy twist.
- Make it mini – Halve the strawberries and dough to make adorable bite-sized mochi – perfect for snack trays or party platters.
It’s fun to get creative once you’ve nailed the basics – these are treats that really invite a personal touch.
Now that your mochi are wrapped and looking adorable, let’s talk about how to serve them in style!
How to Serve Mochi Strawberry for Any Occasion
Whether you’re bringing these to a gathering or treating the family after dinner, mochi strawberry always feels a little extra special. Try these fun and thoughtful ways to serve and enjoy them:
- Cut a few open – Slicing one in half reveals the strawberry center – it looks beautiful and helps guests see what’s inside.
- Match with fruit – Serve on a tray with kiwi slices, orange segments, or blueberries for color contrast and freshness.
- Build a dessert board – Combine mochi with mini cookies, chocolate squares, and tea for a cozy little spread.
- Gift box ready – Nestle each piece into a parchment cup or paper liner, then pack into a small bakery box for sharing.
- Color-themed display – Use matcha or strawberry powder in the dough to create variety, or dust the tops with a little powder for a photo-worthy finish.
- Serve with tea – Green tea or jasmine tea is a perfect pairing for the mild sweetness of strawberry mochi.
Presentation is half the fun with this dessert – it’s like edible origami that you get to enjoy with your eyes first.
Let’s make sure any leftovers stay just as lovely tomorrow…
How to Store and Reheat Strawberry Mochi
Good news – mochi strawberry stores well with a few simple steps. Whether you’ve got extras from a batch or are prepping ahead, here’s how to keep them soft and tasty:
- Fridge (best for cream-filled)
Place in an airtight container with parchment or liners between each piece. Keep chilled for up to 24 hours. Bring to room temp for about 10–15 minutes before serving to soften the texture. - Room Temp (for bean-filled)
If your filling is red bean paste, these can sit out in a cool space for up to 6 hours. Just cover lightly to protect from air and dust. - Freezer-Friendly
Wrap each piece individually in plastic wrap, then place in a freezer bag or container. Freeze for up to 1 month. Thaw at room temp (still wrapped) for 20–30 minutes before enjoying. - Quick Softening Tip
For mochi that feels too firm, give it a quick 5–8 second microwave burst (only if it’s red bean filled). Cream-filled pieces should never be microwaved – just let them come to temp naturally.
Treat your leftovers with a little care, and they’ll taste just as tender and delicious the next day.
More Desserts You May Love
If you enjoyed making mochi strawberry, here are a few more treats from the kitchen that are just as fun and flavorful:
- Fresas con Crema – A sweet and creamy berry favorite
- Jamaican Desserts – Bold, tropical flavors in every bite
- Gipfeli Recipe – Buttery Swiss pastries you’ll want to try
Mochi Strawberry (Chewy Strawberry-Filled Japanese Treat)
Equipment
- Microwave-safe bowl or steamer setup
- Whisk and silicone spatula
- Measuring cups and spoons
- Bench scraper or knife
- Silicone mat or parchment
- Soft brush (for removing excess starch)
- Small liners or cupcake papers (optional but cute!)
Ingredients
Basic Dough & Filling:
- 1 cup glutinous rice flour mochiko
- ¼ cup granulated sugar
- ¾ cup water
- Pinch of salt
- 8 small-to-medium fresh strawberries hulled and dry
- ½ cup potato starch or cornstarch for dusting
- 1 cup sweet red bean paste or vanilla cream whipped cream with powdered sugar + vanilla
Optional Add-ins:
- ½ tsp matcha powder for color + earthy note
- 1 Tbsp freeze-dried strawberry powder for berry aroma
- 2 Tbsp cream cheese for a tangy vanilla filling
Instructions
- Prep strawberries – Wash, hull, and dry completely.
- Wrap filling – Coat each berry in red bean paste or lightly whipped vanilla cream. Chill or freeze briefly.
- Make dough – Mix mochiko, sugar, salt, and water until smooth. Microwave in short bursts (total 2½–3½ min) or steam until glossy and stretchy.
- Cool and dust – Turn dough onto a well-starched surface and let cool slightly.
- Divide & shape – Cut dough into 8 pieces and flatten into 3-inch circles.
- Wrap berries – Place each berry tip-side down, fold dough over, and seal at the top. Smooth and set seam-side down.
- Rest and clean up – Let rest 10 minutes. Brush off excess starch before serving.
- Serve or chill – Best at room temp. Cream-filled pieces should be stored cold and softened before serving.
Notes
Key Takeaways
- Dry strawberries and warm dough make wrapping easier.
- Glossy, stretchy dough = perfectly cooked.
- Pre-wrapping the filling helps seal cleanly.
- Potato starch keeps everything from sticking.
- Serve at room temp for the softest texture.
- Try fun add-ins like matcha or strawberry powder.
Mochi Strawberry FAQs: Common Questions Answered
Curious about the little details before you dive in? These quick answers will help you feel even more confident about making mochi strawberry at home.
Can I make it without a microwave?
Yes! You can steam the mochi dough instead. Place the batter in a heat-safe bowl, cover it, and steam over gently simmering water for about 15 minutes, stirring once halfway. The dough should turn glossy and stretchy when it’s ready – just like the microwave version.
How do I keep the dough from sticking everywhere?
Dusting is your best friend here. Use potato starch or cornstarch on your hands, tools, and surface. Just don’t go overboard – too much makes the dough dry on the outside. After wrapping, you can gently brush off any extra for a clean finish.
What kind of strawberries work best?
Stick with small to medium, firm berries that are evenly ripe. Larger berries can be tricky to seal, and very soft ones may release moisture and loosen the dough. Dry them well before wrapping for the best results.
My dough keeps tearing – what went wrong?
It probably wasn’t cooled quite enough, or the edges got too thin while shaping. Let the dough sit for a couple of minutes after cooking, then keep the center a bit thicker when flattening. That little detail really helps with sealing.
Can I make this dairy-free?
Definitely, just go with anko (sweet red bean paste) or a plant-based cream that holds its shape. If you’re chilling them, bring them to room temp briefly before serving for the softest texture.
How do I make strawberry mochi look photo-ready?
Work on a dark surface to help the light-colored dough pop. Slice a few pieces open to show off that bright red center, then dust the tops with a little freeze-dried strawberry powder for a fun finishing touch. For clean cuts, lightly oil your knife and wipe it between slices.
Conclusion
There’s something extra sweet about making a dessert with your own hands – especially when it turns out this soft, pretty, and full of strawberry charm. Whether you made a batch just for fun or shared them with friends or family, I hope your kitchen felt a little cozier and your table a little brighter with each bite.
If you gave this mochi strawberry recipe a try, I’d love to hear how it went! Leave a quick review or share your favorite filling combo – it means a lot and helps others in the kitchen too.