
Have you ever stood in your kitchen, craving something that’s just a little different from the usual desserts? Something easy enough to pull together in your own kitchen, yet still feels like a little celebration when you cut the first slice? That’s exactly where this Matcha Cheesecake comes in. It’s the kind of recipe that makes you feel proud when you bring it to the table – that perfect mix of creamy, rich, and just the right hint of matcha to make every bite a treat.
Sometimes cheesecakes can feel a little fussy or intimidating, but not this one. I’m going to walk you through every step, just like we’re standing side-by-side in the kitchen. You’ll see how easy it is to get that smooth, beautiful finish without any stress. In this post, we’ll cover everything you need – from the ingredients you’ll want to grab to the baking tips that help your cheesecake turn out picture-perfect. Let’s get our aprons on and jump right into it!
Why You’ll Love This Matcha Cheesecake Recipe
There’s something special about making a Matcha Cheesecake that feels both comforting and just a little fancy. Whether you’re serving it at a gathering or enjoying a slice on a quiet afternoon, this recipe brings together smooth matcha flavor and a buttery crust in the most satisfying way.
Family Friendly: Everyone at the table will find a reason to reach for seconds.
Customizable: Try it as a matcha basque cheesecake or fold in white chocolate chips.
Simple Steps: No complicated tools or tricky techniques.
Any Occasion: Perfect for birthdays, holidays, or a cozy weekend treat.
You’ll love how easily this cheesecake comes together and how beautiful it looks when you set it out to share. Let’s walk through the ingredients next so you can start planning your own batch!
Essential Ingredients for the Perfect Matcha Cheesecake
Let’s start with what you’ll need to bring this beautiful Matcha Cheesecake to life. Each ingredient has its own little role to play, and together they create something that’s creamy, rich, and just the right touch of cozy.
Basic Ingredients
Graham cracker crumbs – 1½ cups
(These form the crunchy, buttery crust that holds everything together.)
Unsalted butter – 5 tablespoons, melted
(Adds richness and helps the crust set nice and firm.)
Cream cheese – 24 ounces, softened
(The heart of the cheesecake – smooth, tangy, and creamy.)
Granulated sugar – 1 cup
(Sweetens the filling just enough without overpowering the matcha flavor.)
High-quality matcha powder – 2 tablespoons, sifted
(This brings the earthy, slightly sweet flavor and that gorgeous green color.)
Large eggs – 3, room temperature
(They give the cheesecake structure while keeping it silky.)
Heavy cream – ½ cup
(Adds a luscious, light texture to the filling.)
Pure vanilla extract – 1 teaspoon
(A warm, comforting background note that ties everything together.)
Fine sea salt – ¼ teaspoon
(A little pinch enhances the flavors and makes the sweetness pop.)
Optional Add-Ins
White chocolate chips – ½ cup
(For extra little pockets of sweetness throughout the cheesecake.)
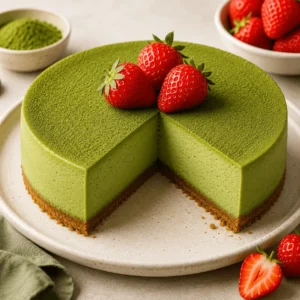
Fresh strawberries – sliced for garnish
(Perfect if you want a fruity finish for a strawberry matcha cheesecake twist.)
Pro Tip:
Feeling adventurous? For a Japanese matcha cheesecake spin, try swapping the graham cracker crust for a soft sponge base. Or, if you’re in the mood for something bold like a matcha basque cheesecake, use a higher oven temp to get that deep golden top!
Now that your ingredients are ready, let’s move on to the fun part – bringing it all together!
How to Make Matcha Cheesecake Step-by-Step
Get ready – this is the part where your kitchen starts to smell amazing and your cheesecake dreams start coming true. I’ll guide you through each step, just like if we were baking together at home!
Step-by-Step Instructions
1. Prep your pan and set the stage
Wrap the outside of a 9-inch springform pan tightly with two layers of foil. Lightly grease the inside with non-stick spray. This keeps everything neat and makes sure no water sneaks into your cheesecake while it bakes.
2. Build your crust
In a medium bowl, stir the graham cracker crumbs and melted butter until everything feels like damp sand. Gently but firmly pack the mixture into the base of your prepared pan, making sure it’s nice and even. Bake at 350°F (175°C) for 10 minutes. Your kitchen will start smelling warm and buttery – that’s your cue it’s ready! Let the crust cool while you move on.
3. Mix the cream cheese and sugar
In a large bowl, mix the softened cream cheese and granulated sugar on medium speed until they come together smoothly. Keep going until the mixture is smooth and creamy, about 2–3 minutes. Pause to scrape down the sides and bottom of the bowl to catch any sneaky lumps hiding.
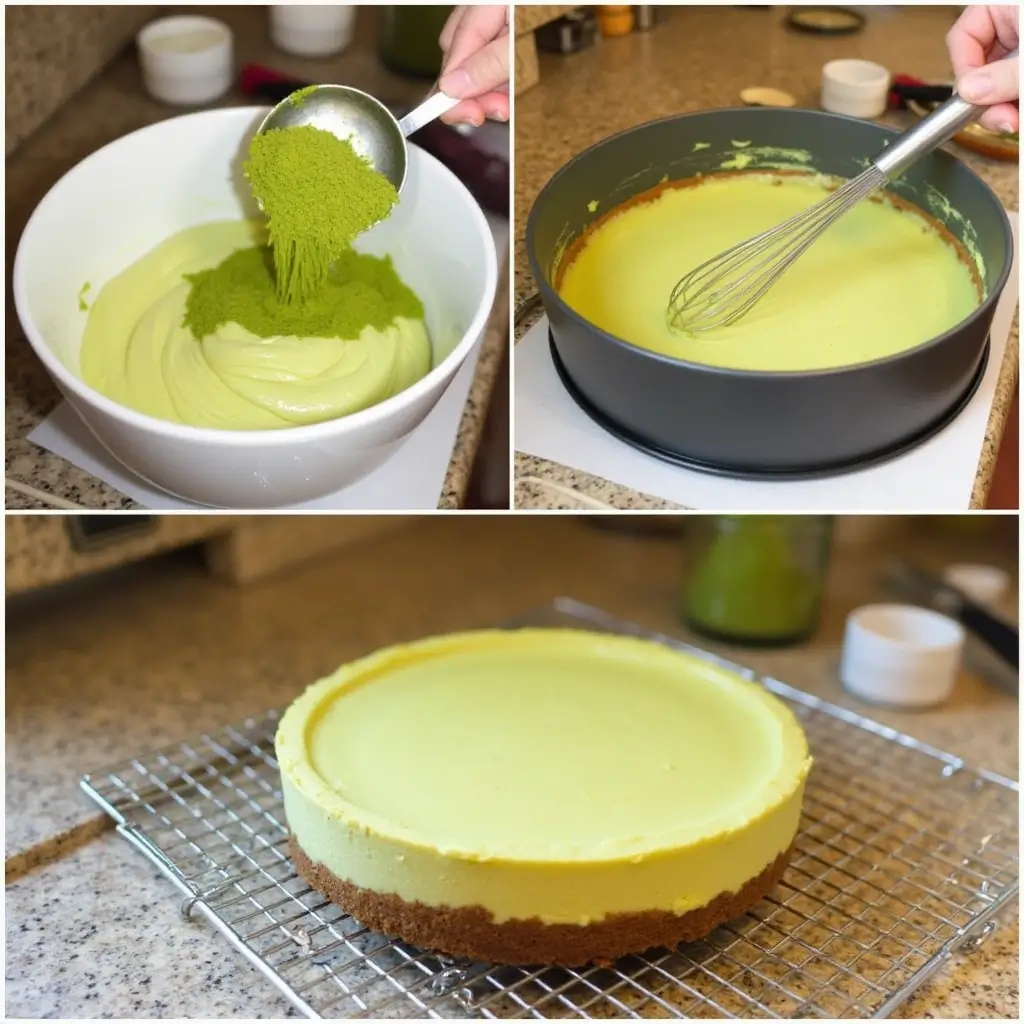
4. Add the matcha magic
Sift the matcha powder directly over the cream cheese mixture. This prevents clumps and gives a beautiful even color. Blend just until the batter turns a soft, even green.
5. Blend in the eggs one by one
Crack in the eggs one at a time, blending slowly after each to keep the batter nice and smooth. It’s important not to rush this step – gentle mixing helps keep the texture creamy and avoids introducing too much air, which can cause cracks.
6. Stir in the cream, vanilla, and salt
Slowly add the heavy cream, stir in the vanilla, and finish with a light sprinkle of salt. Mix on low just until everything is combined and the batter looks silky and thick. (It should fall in ribbons from your spoon.)
7. Pour and prepare for baking
Gently pour the batter over the cooled crust, smoothing the surface with a spatula, then nestle your springform pan into a larger roasting pan. Fill the roasting pan with hot water halfway up the sides of the springform pan to create a gentle water bath.
8. Bake to perfection
Lower the oven to 325°F (163°C) and bake for 55–65 minutes. You’ll know it’s ready when the edges are set but the center still jiggles slightly if you nudge the pan. (Think of it like the wobble of a soft pillow.)
9. Cool slowly
Turn off the oven and crack the door open. Let the cheesecake sit inside for 1 hour. This slow cooling helps prevent sudden temperature changes that could crack the surface.
10. Chill completely
Lift the cheesecake out of the water bath and carefully remove the foil. Keep it in the pan, cover it, and let it chill in the refrigerator for at least 6 hours, or overnight for the best texture. This allows the flavors to settle and the texture to firm up beautifully.
11. Slice and serve
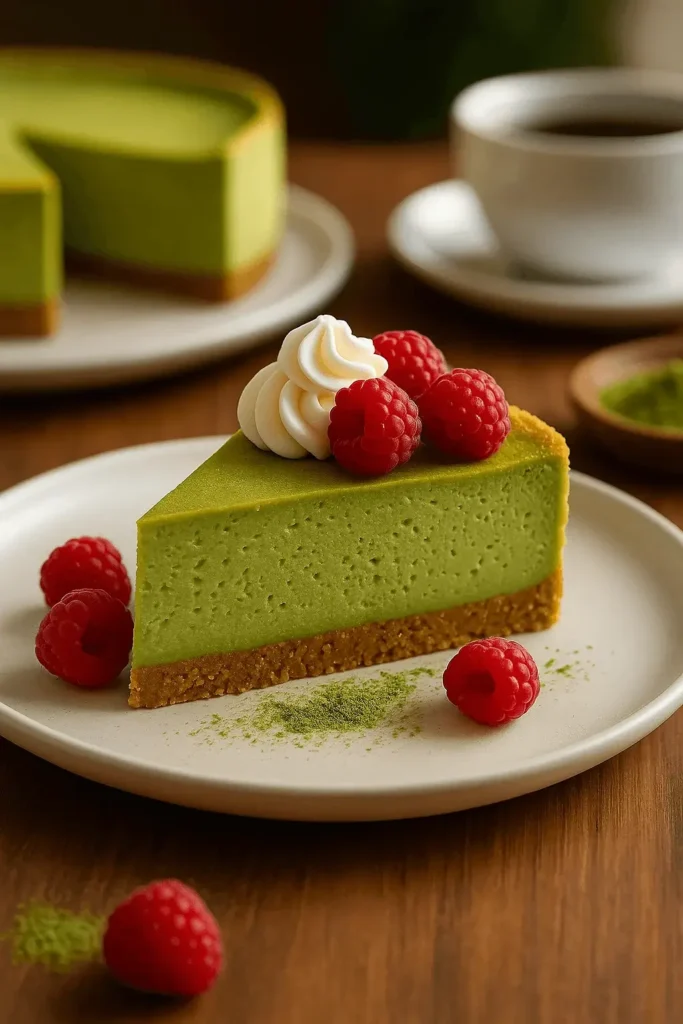
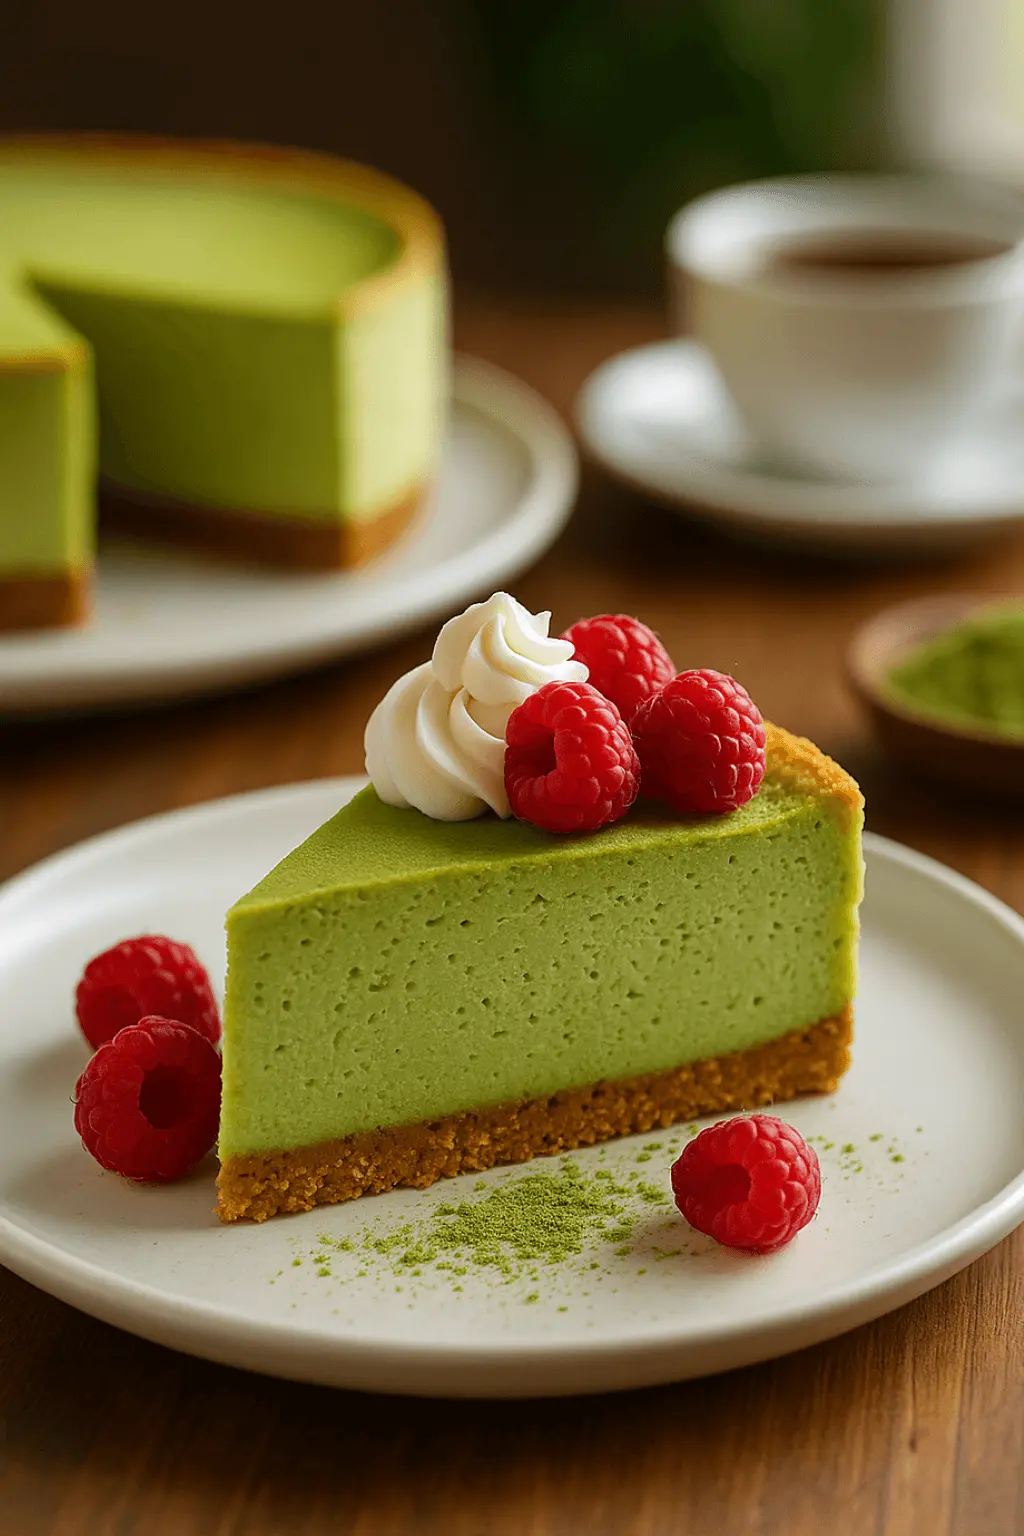
When you’re ready to serve, run a thin knife around the edge of the cheesecake to loosen it from the pan. Use a hot, dry knife for slicing clean, beautiful wedges. Add any toppings you love – fresh strawberries, a dusting of matcha, or a light drizzle of white chocolate.
Taking your time with each step really makes all the difference – and when you take that first bite of this creamy, velvety Matcha Cheesecake, you’ll know it was all worth it.
Chef Tips and Fun Variations for Your Matcha Cheesecake
Baking cheesecake at home feels a little like a cozy project, and I’m here to share the little tips and tricks that make a big difference. Think of these as the secret notes a mom would jot down for you on a recipe card.
Always start with room-temperature ingredients – Cold cream cheese and eggs make it hard to get that smooth, creamy batter. Let them sit out before you start, and mixing will be a breeze.
Don’t skip sifting your matcha powder – A quick sift ensures no clumps sneak into your batter, giving you that lovely even green color that’s so pretty when sliced.
Mix gently once the eggs are in – Over-mixing at this stage can introduce too much air, which sometimes leads to cracks. Keep it nice and easy.
Try different crusts for fun – Swap graham crackers for crushed chocolate cookies for a playful twist, perfect if you love the flavor combination in a matcha cheesecake brownies style.
Want a “burnt” style cheesecake? – If you’re feeling adventurous, bake it at a higher temperature without the water bath to create a deeper caramelized top like a matcha basque cheesecake!
Mini cheesecakes for easy sharing – Pour the batter into lined muffin tins for adorable mini matcha cheesecakes. Great for parties or little treats for the week!
Taking the time to do these small things really makes your matcha cheesecake recipe feel extra special, and watching your family and friends smile with the first bite? That’s the best part.
Creative Serving Suggestions for Matcha Cheesecake
When a cheesecake turns out as lovely as this one, you want to present it in a way that feels just as special. Whether you’re hosting a big celebration or having a cozy family dinner, here are some sweet ideas to make your Matcha Cheesecake shine:
Simple and classic – Dust the top lightly with extra sifted matcha powder for a clean, elegant look.
Berry beautiful – Add a handful of fresh strawberries or raspberries around the base for a pop of color and a bright, fruity contrast.
Chocolate drizzle – Melt a little white chocolate and drizzle it across the top for a pretty finish – this pairs so well if you went with the optional white chocolate chips!
Celebration-ready – Decorate with edible flowers or tiny mint leaves for a garden party vibe. Perfect for spring birthdays, Mother’s Day, or showers.
Tea party treat – Serve small slices alongside a pot of green tea or jasmine tea for a lovely afternoon gathering that feels straight out of a storybook.
No matter how you dress it up, this cheesecake always feels like a little gift on the table – and it disappears fast once you slice it!
And if you’re lucky enough to have leftovers, here’s how to keep them fresh and delicious…
Best Ways to Store and Reheat Matcha Cheesecake Leftovers
One of the best things about cheesecake is that it holds up beautifully, so go ahead and bake it ahead, savor it slowly, or sneak a little midnight slice. Here’s how to take care of your leftover Matcha Cheesecake:
In the fridge –Cover the cheesecake snugly with plastic wrap or tuck slices into an airtight container. It will stay fresh and tasty for up to 4 days.
In the freezer – To freeze, wrap individual slices in plastic and then foil. Place in a freezer-safe bag or container. Freeze for up to 2 months. When you’re ready for a slice, let it thaw gently in the fridge overnight.
Serving again – Cheesecake tastes best when it’s not super cold. Let refrigerated slices sit out for about 15–20 minutes before serving to soften slightly and bring out all those creamy flavors.
There’s just something comforting about knowing you have a little piece of homemade goodness waiting for you in the fridge, don’t you think?
The Best Matcha Cheesecake You’ll Love to Bake
Equipment
- 9-inch springform pan
- Aluminum Foil
- Mixing bowls
- Stand mixer or hand mixer
- Fine-mesh sieve
- Rubber spatula
- Roasting pan (for water bath)
- Kitchen towel
- Thin knife for slicing
Ingredients
- 1½ cups graham cracker crumbs
- 5 tablespoons unsalted butter melted
- 24 ounces cream cheese softened
- 1 cup granulated sugar
- 2 tablespoons high-quality matcha powder sifted
- 3 large eggs room temperature
- ½ cup heavy cream
- 1 teaspoon pure vanilla extract
- ¼ teaspoon fine sea salt
Optional:
- ½ cup white chocolate chips
- Fresh strawberries for garnish
Instructions
- Wrap springform pan with foil; lightly grease inside.
- Mix graham cracker crumbs and butter; press into pan. Bake crust at 350°F (175°C) for 10 minutes.
- Lower oven to 325°F (163°C).
- Beat cream cheese and sugar until smooth and creamy.
- Sift matcha over the batter; blend gently.
- Add eggs one at a time, mixing slowly after each.
- Stir in cream, vanilla, and salt until silky.
- Pour filling over cooled crust; smooth the top.
- Place springform pan inside roasting pan; pour in hot water halfway up sides.
- Bake 55–65 minutes, until edges are set and center jiggles slightly.
- Cool inside oven for 1 hour with door cracked open.
- Chill in the fridge at least 6 hours or overnight.
- Slice with a warm knife and serve with your favorite toppings!
Notes
Key Takeaways
- Matcha Cheesecake blends creamy texture with a beautiful, earthy green tea flavor.
- Sifting the matcha powder keeps the batter smooth and evenly colored.
- A gentle water bath helps create a soft, crack-free finish.
- You can customize it with different crusts, toppings, or even turn it into mini cheesecakes.
- This dessert is make-ahead friendly, perfect for celebrations or simple family gatherings.
Matcha Cheesecake FAQ: Common Questions Answered
What grade of matcha should I buy for baking?
For the best results, stick with culinary-grade matcha powder from a trusted brand. It’s made for recipes like this and gives your Matcha Cheesecake that bright, beautiful color without overpowering the flavor.
Do I really need to bake it in a water bath?
A water bath helps the cheesecake bake gently and stay smooth. If you skip it, your cake might develop a few surface cracks, but it’ll still taste wonderful. If you want a more rustic look, you can bake it at a higher temperature for a style closer to a matcha basque cheesecake.
Why does my cheesecake taste a little bitter?
A bitter flavor usually means too much matcha was added or the powder quality wasn’t ideal. Stick to 2 tablespoons of sifted, good-quality matcha, and you’ll get that perfect balance in your matcha green tea cheesecake.
How can I make this cheesecake gluten-free?
It’s simple! Just use gluten-free cookies for the crust and double-check that all your ingredients are labeled gluten-free. Your bake time and steps stay exactly the same.
Can I add chocolate to this cheesecake?
Absolutely! Folding white chocolate chips into the batter or drizzling melted white chocolate on top after chilling adds a sweet little twist. It’s a fun way to personalize your matcha cheesecake recipe.
Is it possible to make a no-bake version?
Yes, you can! To make a no bake matcha cheesecake, replace the eggs with 2 teaspoons of powdered gelatin (bloomed in 3 tablespoons of water). Blend it into the room-temperature filling, pour it into the crust, and chill until set.
Conclusion
Now that you have everything you need, it’s time to grab that springform pan and create a Matcha Cheesecake that’s every bit as beautiful as it is delicious. I hope this recipe brings a little extra joy to your kitchen, whether you’re baking it for a special gathering or just to treat yourself and your family.
If you give this cheesecake a try, I would love to hear how it turned out for you! Feel free to leave a review and share your experience – your feedback always means so much and helps others feel right at home in the kitchen too.